Authentic tried and tested simple recipes in mainly Indian cooking, including traditional mangalorean, Goan, East Indian, North Indian recipes and much more…
A delicious, light and satisfying curry served with simple boiled rice or khichidi for days when you need a quick meal or something light to tide you through the day!
Ingredients
250 ml or 500 ml Thick Butter milk or Laban (undiluted)
2 green chillies
1” pc ginger
½ tsp. mustard seeds
1 stalk curry leaves
¼ tsp. turmeric
½ tsp. fenugreek (methi) seeds powder
½ tsp. garam masala powder
1 tsp. salt or to taste
1 tsp. ghee
Method
Heat a pan, add the ghee, when hot add the mustard seeds, when they pop add the curry leaves, chillies, ginger and saute for a minute.
Add the turmeric, garam masala and methi powder and saute for a minute.
Then add the butter milk and salt.
If using bottled laban (butter milk) rinse the bottle with ¼ cup of water and add to the curry
Heat the curry, stirring occasionally till the edges show signs of boiling.
Switch off and serve immediately.
The curry does not require to be boiled or else it will split/curdle.
Just heat through and serve immediately as an accompaniment with steamed rice, khichidis, pulaos, etc.
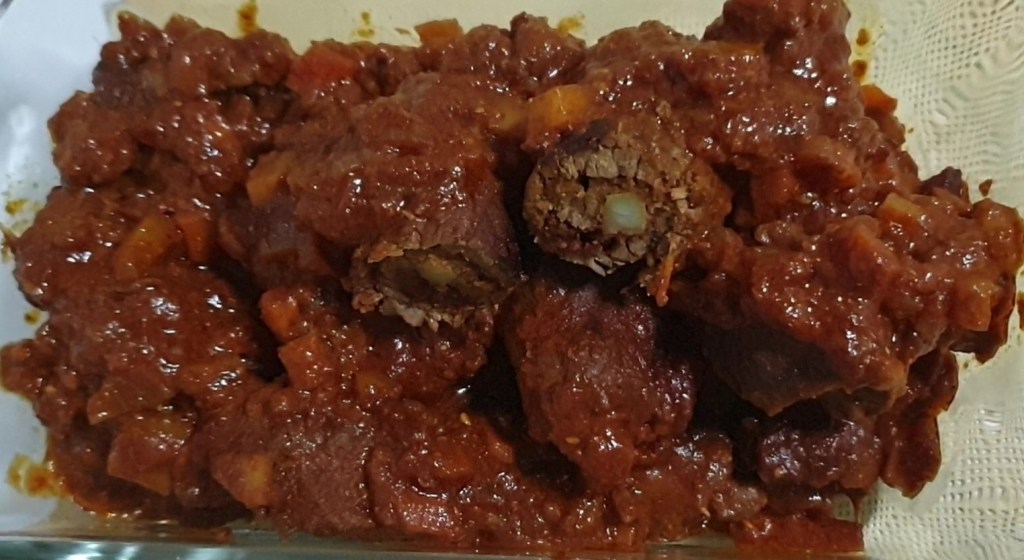
Beef steak stuffed rolls – I am calling this Goan Beef Roulade because this is the spicy version of Beef Olives with typical Goan flavors as it includes Chorizo (Goan sausages) in the stuffing. The Beef Olives I have made earlier are a milder version leaning more towards continental cuisine. Try them, both are delicious in their own right!!
Ingredients
1 kg. Beef steaks, beaten
2 medium chopped onions
2 tbsp. tomato paste
2 to 4 tbsp. oil or ghee
Stuffing : Potato, Carrots, Choris (Goan sausages), Bacon, as required
Grind to a smooth paste
10 red chillies
1 ½ “ pc. Ginger
10 cloves garlic
10 cloves
1” cinnamon
1 tsp. cumin seeds
½ tsp. peppercorns
½ tsp. turmeric
4 tbsp. vinegar
1 tsp. salt
Method:
P.S.: Ask the butcher to beat and flatten the steaks well. If not you will need to use a mallet or heavy pestle to beat the steaks to thin them so forming the rolls is easier.
Wash, drain and marinate the steaks in the ground masala paste for one hour.
Prepare the stuffing.
Peel, wash and cut one potato in 2” sticks.
Wash carrot, peel and cut into 2” sticks.
Remove the Goan sausages from the casings.
Cut the bacon into 2” strips. As bacon is not available here I have skipped it.
Spread the steaks on a board and trim off any excess meat and you need a rectangle piece.
Reserve the extra meat trimmings
Place the potato, carrot and sausages on one end of the steak and roll into a compact roll.
Secure with string or toothpicks. Thus make all the rolls.
Heat a wide pan, add the oil/ghee and fry the chopped onions, w
When they soften and are translucent, add the tomato paste and saute 2 to 3 minutes.
Place the rolls in a single layer (reserve the excess marinade) and fry 3 to 4 minutes on high till light brown.
Turn over and cook 20 minutes till the gravy almost dries up.
Stir well scraping the bottom of the pan to avoid burning the onions.
Add the excess marinade and some water to rinse the bowl and add to the roulade gravy.
Also add the leftover potatoes and carrots, if any, chopped finely.
Check and adjust seasoning.
Cook till meat is tender and gravy is thick and oil surfaces.
Any rolls that are large in size can be cut into pieces before serving.
Remove the string before serving.
Toothpicks may be left as it is as they can be easily removed. Serve hot.
Xacuti or Xacutti (Konkani: शागोती) is a curry prepared in Goa, India, with complex spicing, including white poppy seeds, sliced or grated coconut and large dried red chilies.[1] It is usually prepared with chicken, lamb, or beef.[2][3] It is also known as chacuti in Portuguese.
Xacuti or Shagoti as is commonly known in Goa has its origin in Harmal (now Arambol) in Pernem Taluka of Goa. Here fisherman in the olden days used to get a fresh catch of fish or a local chicken and prepare a gravy for this dish. The gravy typically used local spices like black pepper (meerya), chilli, turmeric, onion, nutmeg, cinnamon, clove, etc. The hero was a mildly roasted coconut kernel which is finely grated and lightly toasted. – Source Wikipedia:
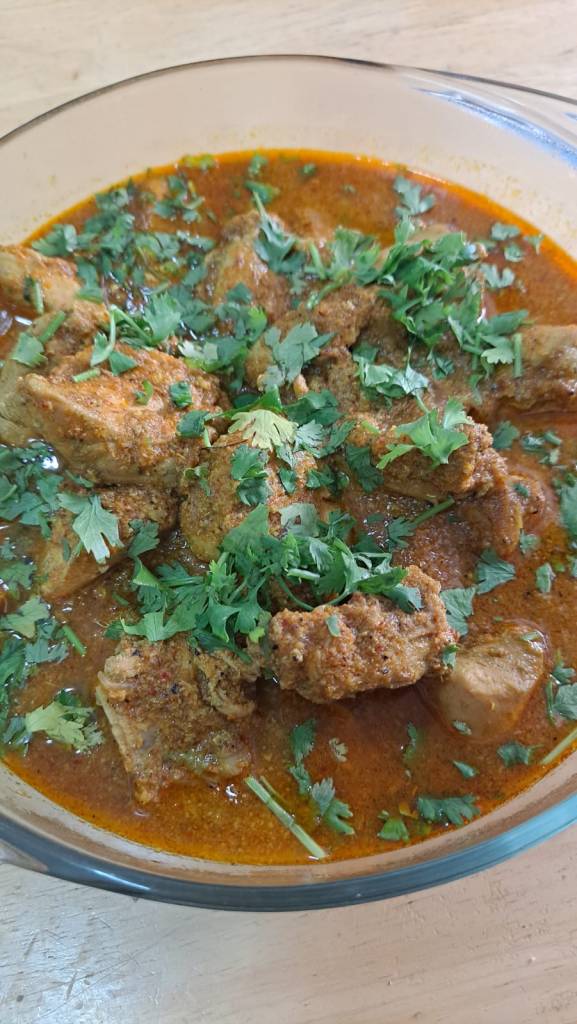
Chicken Xacuti
A traditional Goan dish, Xacuti (pronounced ‘Sha-kooti’) almost always made with chicken and the complex array of spices used in preparation of this dish makes is wonderfully flavorful and unique. Xacuti may also be prepared with beef or lamb.
Ingredients
1 ½ Kg. Chicken
¼ tsp. turmeric powder
1 tsp. salt
Marination
2” pc. ginger
10 flakes garlic
½ bunch coriander leaves
5 green chillies
Xacuti Masala I
Fry in 1 tsp. oil and grind
1 tsp. oil
3 onions, sliced
3 green chillies
1.5” pc. Ginger
7 garlic flakes
1 large coconut (2 cups grated)
½ bunch coriander leaves
Heat oil in a pan and saute sliced onions, green chillies, ginger, garlic for 3 minutes. Add grated coconut and saute for another 5 to 7 mns. Once onions are crispy, keep aside.
Xacuti Masala II
Dry Roast the following
¼ pc. nutmeg
2” cinnamon
3 cardamoms
1 star anise
1 tsp. fennel (badishep, saunf)
1 tsp. black pepper
1 tbsp. poppy seeds
1 tbsp. coriander seeds
8 to 10 kashmiri chillies
½ tsp. turmeric
Grind all the above together to make the xacuti masala paste.
Xacuti preparation
2 tsp. oil
2 onions, sliced
2 green chillies, slit
¼ cup water
Method
Clean, remove skin and cut chicken into pieces.
Wash and drain. Add salt and turmeric powder to chicken pieces.
Grind the marination masala and marinate the chicken pieces for half an hour, or overnight if desired.
Heat oil and add onions and green chillies and fry for a minute.
Add the marinated chicken and saute for 2 minutes.
Add the xacuti masala and water and cook 30 to 45 minutes or till chicken is tender.
Frango à Cafreal is a spicychicken preparation consumed widely in the Indian state of Goa. The preparation originated from the Portuguese colonies in the African continent.[1] It was introduced into the Goan cuisine by the Portuguese and the African soldiers serving under the Portuguese.
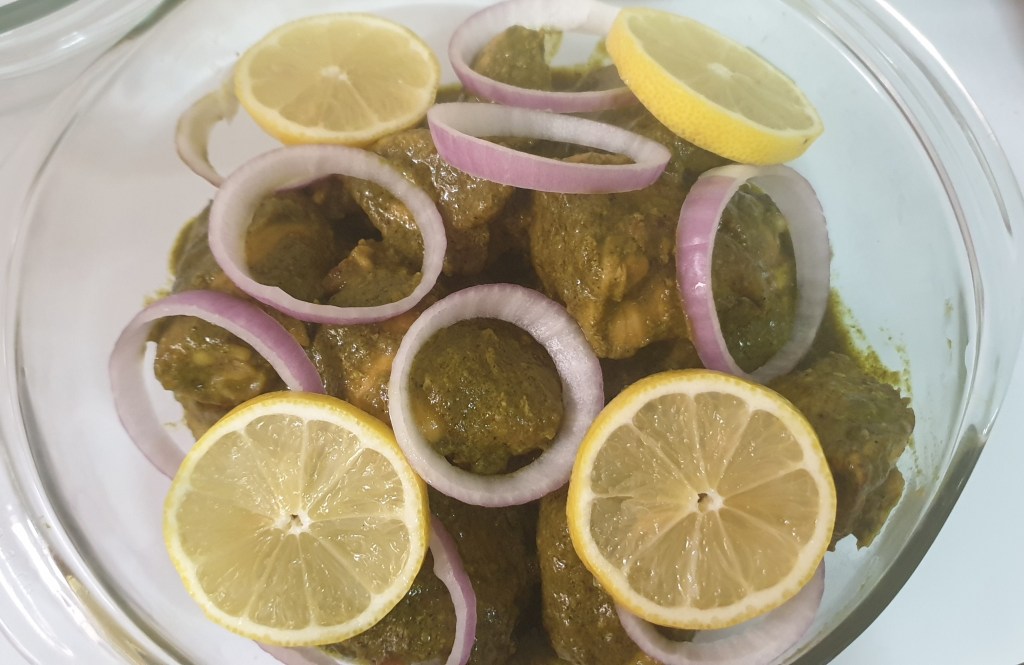
The generic preparation involves green chillies, fresh coriander leaves, onion, garlic, ginger, cinnamon, pepper, chilli, mace, clove powder and lime juice or vinegar. Chicken Cafreal is always made from whole chicken legs, flavoured with the spices and herbs mentioned and then shallow fried.[2] Chicken Cafreal is usually accompanied by potato wedges and lime wedges. It is a popular dish in the bars and taverns of the state. – Source: Wikipedia
This recipe s inspired by Late Wendell Rodricks
Cafreal – Chicken Cafreal
Ingredients
1.5 kg. Chicken
1 tsp. garam masala powder
1 tsp. black peppercorns
½ tsp. Turmeric powder
1 bunch coriander leaves (about 100 gms)
12 to 15 flakes garlic
2” piece ginger
6 green chillies (or to taste)
10 cashewnuts
2 Onions
4 Tomatoes (deseeded) (Optional)
2 tbsp. lemon juice
Salt to taste
1 tbsp. Coconut oil
2 tbsp. ghee or as required
Method
Clean and cut the chicken into large pieces.
Wash and set aside to drain.
Grind to a paste the ingredients from garam masala to lemon juice alongwith the salt.
Marinate the chicken with this masala.
Refrigerate overnight.
Heat 2 tbsp ghee and fry the chicken in batches to light brown to seal the juices.
Set chicken aside
Reserve the marinade.
Add the coconut oil to the ghee left over from frying the chicken.
If not add a tbsp of ghee to a vessel, heat and fry the masala paste for 5 minutes till the raw smell disappears and fat leaves the masala.
Add the chicken, salt (if required), 1 cup hot water and cook till chicken is tender and gravy is thick.
Serve hot garnished with onion rings and lemon wedges.
Repeated reheating gives a deeper color and improves the taste and texture of the gravy and the Cafreal just tastes better!
With mangoes in abundance this season, enjoy the goodness of this nutritious fruit with the cooling effects of sago pearls
Mango: High in Vitamin C, folate & beta-carotene in addition to variety of nutrients.
Sago: Gluten free, cooling and antioxidant, reduces inflammation and improves immunity.
Ingredients
3 to 4 Mangoes
1 cup sago
2 cups coconut milk
2 cups water
½ cup crystal sugar
½ tsp salt optional
Bring 3 cups water to boil in a saucepan, add the sago and cook for ten minutes.
Switch off the flame and leave covered for ten minutes.
Drain and add the sago to a bowl of cold water to rinse. Drain.
Add the sago pearls along with the coconut milk, water and crystal sugar and salt to a pan and cook on medium flame till sugar dissolves and mixture thickens a little.
Remove from flame and leave to cool.
Chill till ready to serve.
Chop or slice the mangoes and reserve, before serving top with mango slices or pieces.
If you wish, puree some mango pieces and add the puree to the sago pudding and mix,
The mother of all biryanis! How to make 5-Star quality Biryani!! You don’t need to go to a five star hotel/restaurant, you can enjoy it at home! The recipe may seem daunting but the result is a foolproof excellent biryani sure to please.
Source : Wikipedia
In a kacchi biryani, layers of raw marinated meat are alternated with layers with wet, pre-soaked, raw rice (which may be treated with different spices as above), and cooked together by baking or medium-to-low direct heat (typically, for at least an hour). Cooking occurs by a process of steaming from the ingredients’ own moisture: the cooking vessel’s lid is sealed (traditionally, with a strip of wheat dough) so that steam cannot escape.
A yoghurt-based marinade at the bottom of the cooking pot provides additional flavor and moisture. Potatoes often comprise the bottom-most layer (a technique also used in Iranian cuisine), because, with their natural moisture content, they brown well with less risk of getting burned accidentally. The lid is not opened until the dish is ready to serve.
Kacchi biryani is technically much more demanding and time-consuming than pakki biryani, for the following reasons:
The different ingredients—meat, rice, potatoes—have different cooking times: tender cuts of meat/chicken can be fully cooked well before the rice is done. To prevent this, many kacchi recipes use parboiled (semi-cooked) rice rather than raw rice.
If direct heat is used, there is a risk that the food layer in contact with the vessel bottom may get burned while the interior’s contents are still raw. This risk is minimized by sustained baking with moderate heat, or very slow cooking on low direct heat. This approach, however, increases cooking time considerably.
One method is cooking the dish “blind”, with the cooking vessel sealed, so one cannot monitor cooking progress—it takes experience to cook a kacchi biryani just right.
Watch the video for tips and information on making the perfect Kacchi Biryani!
Shahi Biryani / Kacchi Biryani
I Meat –
1 Kg. leg and shoulder of mutton
1 tsp. salt
½ tsp. yellow color
3” pc. Ginger
15 flakes garlic
5 green chillies, or to taste
1 large bunch coriander leaves
1 ½” x 1 ½” pc. Peeled raw papaya (I sometimes omit this if not available)
2 tsp. white cumin seeds (regular cumin seeds)
8 cloves
6 cardamoms
1” pc. Cinnamon
1 ½ tsp. black cumin
¼ tsp. nutmeg powder
2 blades mace
2 cups beaten curd
1 ½ tsp. salt or to taste
2 tsp. chilli powder or to taste
Clean and cut mutton into large pieces, wash and drain.
Rub in the salt and keep aside for 15 minutes.
Drain out the water completely and apply yellow color.
Powder all the ingredients from cloves to mace.
Mix the masala powder into the mutton and set aside.
Grind all the ingredients from ginger to white cumin seeds to smooth paste.
Marinate the mutton for minimum 30 mns. to 1 hour with the ground paste, curd, chilli powder and salt if required.
At this stage the mutton can be pre-prepared and refrigerated overnight.
II Browing Onions and Potatoes
2 cups ghee
6 to 10 large onions (I have used 10 as I like to use more onion as it does enhance the taste)
6 large potatoes
1/2 tsp. salt or to taste
½ tsp. yellow color
10 boiled eggs (optional)
N.B. Don’t be alarmed by the proportion of ghee, its just for frying the onions just about 1/2 cup will be used for the Biryani.
Slice onions.
Heat ghee and fry till rich brown and crisp. This process will take about an hour.
Initially keep the heat high and as it begins browning, lower the heat otherwise the onions could get burnt and impart a bitter taste.
So it is a good idea to start with browning the onions first and as they are frying you can go about preparing the meat, etc.
Drain the onions and keep aside.
Peel and cut potatoes horizontally into half, wash and drain.
Prick lightly with fork and apply yellow color and pinch of salt.
Fry the potatoes in the same ghee as the onions to light brown. Drain and keep aside.
Add about ½ cup of the remaining ghee to the marinating mutton, mix.
Boiled eggs are optional. But as we love the addition of eggs, I have added 10 eggs.
Boil for 3 minutes, switch off and leave in the water for 10 to 15 minutes minutes.
Drain the water and shell under running water so it is easy to peel.
Make a slit on one side of the egg and keep aside.
III Rice –
½ to 1 kg. Basmati (good quality) Rice (I used 1 kg. rice as we prefer the biryani to have more rice)
Sufficient water to cook the rice
6 cloves
4 black cardamoms (use 6 green if you don’t have black on hand)
1/2 “ pc. Cinnamon
2 tsp. salt or to taste
½ tsp. black cumin
¼ cup rose water
1 tsp. saffron
½ cup warm milk
¼ tsp. yellow color
Wash and drain the rice.
Soak for atleast 30 minutes.
Bring water to a boil and add the cloves, cardamoms, cinnamon, cumin and salt.
Add rice, cook 5 minutes only, till half done and then drain, but keep aside 1 cup of the drained water.
Heat, crush and soak saffron in the warm milk.
Mix the yellow color in the saffron milk.
IV Assembling the Biryani –
Take a deep thick bottomed vessel wide enough to hold the mutton in a single layer without space in between the mutton pieces.
Spread the mutton with the marinade at the bottom of the pan.
Dot with a little of the remaining ghee and arrange the potatoes and boiled eggs alternating with each other over the mutton.
Sprinkle half the rose water, some of the saffron milk and generously with the fried onions, crushed (save some for garnish).
Over this place the parboiled rice and press slightly.
Sprinkle the rice water all over, then the remaining rose water and dot with the saffron milk and pour the remaining milk in the centre.
Drizzle some of the remaining ghee, if desired.
Cover and seal the vessel. Either use dough made of wheat flour and water to seal the edge of the vessel or use silver foil to seal and cover tightly.
Place the sealed vessel on a high flame for 15 minutes.
Then transfer to a very hot (450 deg F) oven and cook for 1 hour.
Alternately, cook on the stove top on very low flame (after the 15 minutes on high) for 1 hour.
A Quick Stir fried Bhindi (Lady Fingers, Okra) with tips on cutting down on the slime and making them tender and crunchy and tips on how to retain the vibrant green colour. Cooked with a minimum of spices, both healthy and enjoyable! Watch video on youtube for tips.
Ingredients
½ kg. Lady Fingers, Bhindi, Okra
2 medium onions, cut into larges pieces
2 flakes garlic
½ tsp. turmeric powder
½ tsp. pepper powder, or to taste
½ tsp. salt, or to taste
2 tbsp. oil
1 tsp. vinegar (helps dissipate the sliminess quicker)
Method
Wash bhindis. Dry with a napkin.
Cut off the head and tail and cut into wedges.
Place in a cooking vessel.
Add the chopped onions, turmeric, pepper powder, oil, salt and vinegar.
Mix thoroughly and keep aside.
Cook just before serving.
To cook, set the vessel on medium high flame and stir fry (keeping the vessel open) till the sliminess in the bhindi disappears.
This happens as soon as the bhindi is cooked and tender.
Do not over cook and don’t close the vessel while cooking or immediately after as the vegetable will lose its vibrant green color.
Serve immediately with rotis or as an side with any main meal.
A good way to add millets to the diet, add some jowar (sorghum) flour to the besan flour for an healthy option. Have for breakfast or as a snack or make a meal of it. For variation, add some finely grated potato and/or zucchini to the batter.
Pancake style – makes 4 to 5 Chilas
Ingredients
1 cup besan (gram flour, chickpea flour)
½ cup jowar (sorghum) flour (or maida, oats, ragi, bajra)
2 green chilies, chopped
1 medium onion, chopped
½ tsp. Ajwain (carom seeds)
Small pc ginger, chopped fine
¼ tsp. turmeric powder
1 tsp. baking powder (to make the chilas thick & fluffy like pancakes)
2 tbsp. coriander leaves, chopped
1 tsp. salt or to taste
Oil for greasing the pan
Method
Mix all the above with sufficient water to make a thick batter and keep for 5 to 10 minutes.
Heat a frying pan, smear the pan with ½ tsp. oil and add ½ cup of batter.
Cover the pan and allow to cook on medium till underside is light brown.
Smear the top of the chilla with ½ tsp. oil and turn over to cook the other side to a light brown.
Remove and serve with Green coriander and mint chutney, Masala Bharwa Mirchi and yogurt.
To make Hari Chutney (Green Chutney)
Grind to a paste:
1” pc ginger
2 green chillies
2 flakes garlic
1 to 2 cups fresh coriander leaves
½ cup mint leaves
2 tbsp. lemon juice
1/2 tsp. salt or to taste
Grind all together to a paste without adding water as far as possible. Serve with chilas, etc.
Delicious Middle Eastern Kabobs – Lebanese style. Superb as appetiser, starter or make a meal of it. And what to say of sandwiches, which are at the heart of middle eastern food and lifestyle. Just slather the pita bread with Toum and pile on the shish taouk kabobs and salads and pickles for a satisfying and delicious snack or meal!
Ingedients
1 Kg. Boneless chicken breasts
6 tbsp. yogurt
1 cup lemon juice, freshly squeezed
1 small slice of lemon with the peel
2 tbsp. apple cider vinegar, if available. If not use regular vinegar
6 tbsp. olive oil
2 tbsp. garlic paste
2 tsp. white pepper or black pepper
1 tbsp. ginger garlic paste
½ tsp. oregano, crushed
1 tsp. chilli powder or paprika
2 tsp. salt, or to taste
1 tsp. tomato paste
Method
Cut the chicken into 1” cubes.
Mix all the ingredients from yogurt to tomato paste and mix well into the chicken cubes.
Marinate for 4 to 6 hours or overnight in the refrigerator.
Heat the grill.
Skewer the chicken and grill till light brown.
Turn over and brown the other side.
Serve with grilled tomatoes, onion, olives, cucumber, olives, etc.
Serve as a appetizer or accompaniment to any main meal.
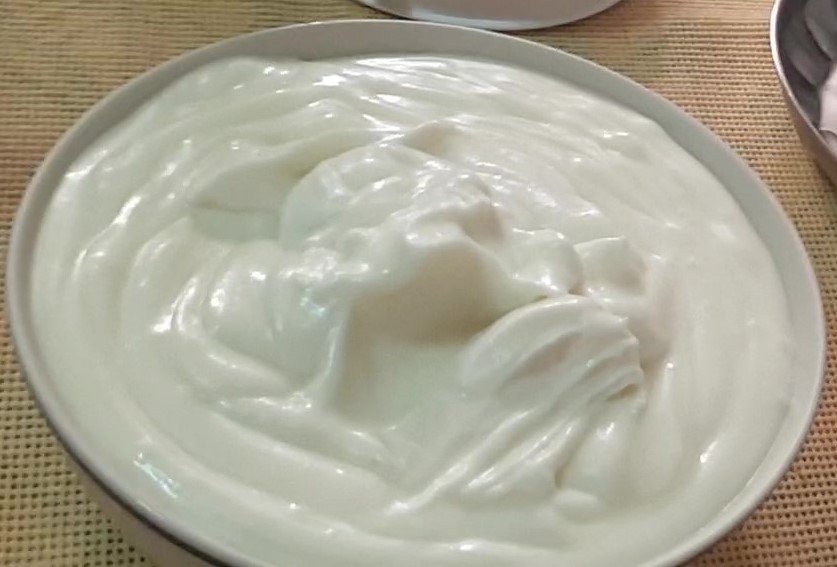
Toum (Garlic Sauce) usually used as a dip for grilled chicken, meat, etc. So creamy and fluffy and ah the taste… simply lip-smacking, you can just eat and lick it as it is. You would never believe it is homemade! Serve with Shish Taouk, Souvlaki chicken, Crispy fried chicken and any grilled meats or roasted vegetable. Slather on pita bread sandwiches or serve as a regular dip!
Traditional homemade garlic sauce
Ingredients
1 cup garlic
1 tsp. salt
¼ cup lemon juice
1/2 cup iced water
3 cups oil, like canola, sunflower
Method
Peel garlic and remove the germ if desired (makes the taste less sharp) by cutting in half and scooping out the germ in the centre of the garlic. I skipped this step today due to lack of time.
Place the garlic with salt in a blender and process till garlic is smooth, use the lemon juice at intervals to facilitate movement of the garlic.
Add a little water if the lemon juice is not sufficient. Adding more lemon juice may make it too sour.
Once the garlic becomes a smooth paste, start adding the first cup of oil in a continuous drizzle while the blender is running.
Stop the blender to give it a rest.
Then continue adding the remaining oil alternating with the iced water till all oil and water are incorporated.
The paste should be light and fluffy by now.
If not add one egg white and run the blender for 2 minutes to achieve the fluffy consistency.
Transfer to a sterilized glass jar or a container and refrigerate.
Use for a month, if it lasts that long!
This recipe makes a large quantity of toum. So it would be better to try with half or quarter of the recipe.
But bear in mind that if the toum doesn’t become thick and fluffy, the garlic mixture should not be wasted, use it in cooking where garlic paste (with tartness) is required.
These stuffed chillies can be consumed as a pickle or an accompaniment or loaded into sandwiches or rotis for a snack! Make a large batch and store in the refrigerator for upto a month!
Bharwa Masala Mirchi
Ingredients
6 large long green Chillies
¼ cup sev (fried bhel puri sev)
1 ½ tbsp. fennel seeds (Saunf)
¼ tsp. Ajwain (carom seeds)
½ tsp. turmeric powder
2 tbsp. coriander powder
2 tbsp. Amchur (Dry mango powder)
1 tsp. salt
¼ tsp. Asafoetida
½ tsp. mustard seeds
4 to 5 tbsp. oil
Wash chillies and wipe dry. Make a slit on the length of the chilli without cutting through. Carefully remove the seeds and the pith with a small spoon or a knife. Leave the stem on.
To prepare filling:-
Powder the sev fine. Grind the fennel and Ajwain to a powder. Mix the sev, fennel, Ajwain, coriander, amchur, turmeric and salt in a bowl and add 2 tbsp. of the oil and mix well.
Stuff the masala powder into the chillies and set aside. Heat the remaining oil and temper with asafoetida and mustard seeds. When the seed pop add the stuffed chillies and fry on medium low heat for 3 to 4 minutes till it changes color and is light brown. Turn and cook other side for 2 minutes. Don’t burn them. When the chillies are soft, switch off flame and cover and keep for 5 minutes.
Serve with besan chillas, rotis or with any meal as pickle or appetiser. Can be preserved for a month in the refrigerator.
The chicken is so amazingly delicious and crispy and crunchy that you just can’t have enough of it. It was just flying off the frying pan. Very simple and easy to make with very few common ingredients. Serve as a starter, appetizer or as an accompaniment with any main meal. Or simply serve as a meal with a green salad and potato fries!
Crispy Fried Chicken
Ingredients
1 Kg. Chicken or Boneless chicken breasts
2 tbsp. ginger garlic paste
1 tsp. salt or to taste
1 to 2 tbsp. vinegar
1 tsp. cumin powder
1 tbsp. coriander powder
½ tsp. garam masala powder
1 tbsp. chilli powder or to taste
1 cup rice flour & 3 tbsp. rawa for coating
Ghee or oil for frying
Clean chicken and cut into large pieces. If using boneless chicken breasts, cut into strips or cubes.
Mix the ginger garlic paste with the masala powders, salt and vinegar to a smooth paste. Add a little more vinegar if the paste is too dry.
Apply this mixture to the chicken and allow to marinate for half an hour or can even keep overnight in the refrigerator.
Roll each piece of chicken in rice flour rawa mixture.
Heat enough ghee/oil in a frying pan.
Place the chicken pieces in the pan.
Deep fry, reduce flame to medium, turning occasionally until a delicate brown and tender about 3 to 5minutes each side.
Caldine or Caldinho in Portuguese, is a typical goan curry recipe used to cook, fish, vegetables or shrimp. It’s a light coconut curry and as the consistency is quite thin can easily double up as a spicy soup. It is mildly spiced and considered a “sweet” curry. This combination of shrimp and cauliflower is quite commonly prepared in a caldine and tastes delicious over boiled rice or with some crusty bread or poee or pao used to mop up the runny curry and the juicy morsels devoured with the crunchy cauliflower and luscious shrimp. Keep the shells of the shrimp intact (provided they are fresh) and you will enjoy sucking and relish the juicy caldine that is trapped in the shells!! Make sure the cauliflower has some crunch, so avoid overcooking.
Ingredients
1 cup medium to large prawns
1 medium cauliflower
1 medium onion
3 green chillies
1 medium tomato
1 tbsp. oil
1 tsp. Salt, or to taste
Grind to a paste
1 cup fresh coconut or 4 tbsp. coconut powder
3 large cloves garlic
½ tsp. cumin seeds
½ tsp. pepper corns
1 tbsp. coriander seeds
1 small marble sized ball tamarind
Method
Shell & devein the prawns. If the prawns are very fresh, keep the shell intact, removing the head and legs.
Wash and drain.
Apply a pinch of salt and turmeric and set aside.
Separate the cauliflower florets and cut into large pieces.
Immerse in salted water for 15 minutes to loosen dirt and kill insects, if any.
Grind the masala to a paste.
Slice the onion, slit the green chilies and chop the tomato.
Heat oil in a vessel,
Add the sliced onion, green chilli and fry till light brown.
Add the tomato and saute till soft.
Add the masala paste with the masala water and additional water for the curry as required,
Add 1 tsp. salt and bring to a boil and simmer 5 minutes.
Add cauliflower and cook 5 minutes till almost tender.
Add prawns and cook 10 minutes.
Adjust seasoning and serve with steamed rice.
Goes well also with Poee, or bread to mop up the delicious gravy
Make a meal of these sandwiches, for brunch, lunch, dinner or simply as a quick snack to satiate you. If you wish to cut down on the carbs, have them as “open sandwiches”, using only one slice of bread. Enjoy these crisp, crunchy sandwiches with various fillings with fresh ingredients that can be adapted to suit your taste. Instead of tomatoes, use cucumbers, jalapenos or gerkins. I am partial to fresh basil and like to use it in everything if I have it on hand. You can substitute basil with parsley or fresh coriander. Feel free to use your preferred sauces like, tomato, mayo, mustard, etc. to suit your taste.
Tapenade and Feta Cheese Sandwich with Zaatar (Wild Thyne or Oregano)
Ingredients – Per Sandwich
2 Slices bread
2 tomato slices
2 tbsp. crumbled Feta cheese
2 to 3 tbsp. Black Olive Tapenade
1 tsp. Zaatar
2 tsp. olive oil
Lettuce, fresh basil and cherry tomatoes for serving
Method
Apply Tapenade to the bread slices. Put one tbsp. olive oil on a hot pan and place the bread slice tapenade side up. Spread the crumble feta cheese, sprinkle the zaatar, drizzle some olive oil and top with the tomato slices. Place the second slice of bread on top of the tomato slices tapenade side down. Apply olive oil to the top of the bread. By now the underside of the sandwich should be brown. Turn over and toast both sides. Serve crisp olive tapenade and feta cheese sandwich with soft succulent centre, with some iceberg lettuce and fresh basil.
2. Grilled Pepperoni Cheese Sandwich
Ingredients – Per sandwich
2 Slices Bread, of your choice
2 slices cheese
8 slices pepperoni
Butter to coat the bread
Dijon Mustard
Method
Butter one side of the bread and place on a skillet or pan, buttered side down. Place 1 slice of cheese and 8 slices of pepperoni on the top of the bread. (You may broil the pepperoni for ½ to 1 minute in the microwave if you wish). Top the pepperoni with a slice of cheese. Cover the open-faced sandwich with a lid. Spread some Dijon mustard on the second slice of bread. When the underside of the open-faced sandwich is brown, top the sandwich with the other slice of bread, mustard side down. Butter the upper side of the bread and turn to brown the other side. The cheese should be melted by now. Remove and serve immediately when brown and crisp on both sides.
3. Grilled Halloumi Tapenade Sandwich
Ingredients – per sandwich
2 slices Bread
3 slices Halloumi Cheese
2 to 3 slices tomato
Iceberg lettuce (or any lettuce you have at hand)
Some fresh basil
2 tbsp. tapenade
Olive oil to brush the bread
Method
Grill the halloumi slices on a hot pan till brown on both sides. Brush the bread slices with olive oil and spread tapenade on the other side of the bread. Place the olive oil side on a hot pan with the tapenade facing up. Top it with the tomato slices, lettuce, basil and halloumi and cover with the second slice of bread, olive oil side facing up. When brown on the underside, flip the sandwich over and toast till brown. Serve immediately, crisp and warm on the outside and crunchy, salty and tangy on the inside!
P.S.: I am partial to fresh basil and use it in everything if I have it at home. Feel free to use any fresh herbs of your choice.
4. Tuna Melts
Ingredients – for one sandwich
1 small tin Canned Tuna (in sunflower oil)
1 small Onion, finely chopped
2 tbsp. Mayonnaise, or as required
1 green chilli, finely chopped (optional)
1 tsp. Sweet relish (optional)
1 tsp. Dijon Mustard (optional)
2 slices of tomato
Fresh Basil
1 slice cheese
Method
Put the tuna alongwith the oil in a bowl, add the chopped onion and green chilli and mash to a paste. Mix with mayonnaise and the sweet relish and mustard, if using. The tuna would taste as good though, without the relish and mustard. But if you love their complex flavors, you would enjoy these additional flavors. Butter one side of the bread and place on a heated griddle, buttered side down. Top with the tuna mayo paste, tomato slices and cheese slice. Add the fresh basil and cover with the second slice of bread, buttered side up. Flip the sandwich over when the underside is brown and toasted. Brown both sides and serve hot and crunchy with the soft juicy delicious tuna filling. Serve with some crisps or potato chips.
For variation: Add gherkins or jalapenos instead of tomatoes
5. Grilled Egg & Cheese Sandwich
Ingredients – for one sandwich
2 slices bread
2 eggs
Salt and pepper for the eggs
2 tomato slices
Butter to spread on the bread
Method
N.B: You need to use a large skillet for this recipe so you get enough of the egg omlete to fold over the sandwich.
Grease the skillet with a little butter and add the beaten eggs seasoned with salt and pepper and spread evenly over the pan. Place one slice of bread buttered side up in the centre of the egg omlete. When the egg browns lightly and sets completely, flip over so that the buttered side of the bread is now touching the pan . Fold the egg over the four sides of the bread. Top with tomato slices and fresh basil (or lettuce or baby spinach) and a slice of cheese. Place the second slice buttered side up on top of the cheese slice and turn the sandwich over the brown both sides. Serve hot and crisp with some green salad or sprouts salad if you wish to serve it as an express lunch or dinner!
6. Halloumi Lettuce Wrap
Ingredients – for one wrap
1 tortilla wrap
Mayonnaise or mayo Sriracha, etc as desired to spread over the wrap
3 to 4 Tomato slices, grilled
3 to 4 Grilled Halloumi
Lettuce, fresh basil, (or coriander leaves or mint)
Method
Place the tortilla on a warm pan on low heat. Drizzle mayonnaise as required and place on one end of the tortilla, grilled halloumi slices, tomato slices, lettuce and basil. Fold into half and serve immediately.


Recent Comments